Preface: I wrote this series of articles to show how to get excellent results in body work with simple tools. It's intended to be a guide for the novice body worker trying to save money, and covers only surface preparation prior to painting. Not everybody can afford the big air compressor and special tools associated with this kind of work for what may be a one time job. I'm into my third full restoration and sixth paint job, and still prefer to keep it simple. I hope this little piece will help someone because any day I can help someone is a good day for both of us. Click here to see all articles in this series
- John D. Weimer
Final Body Preparation
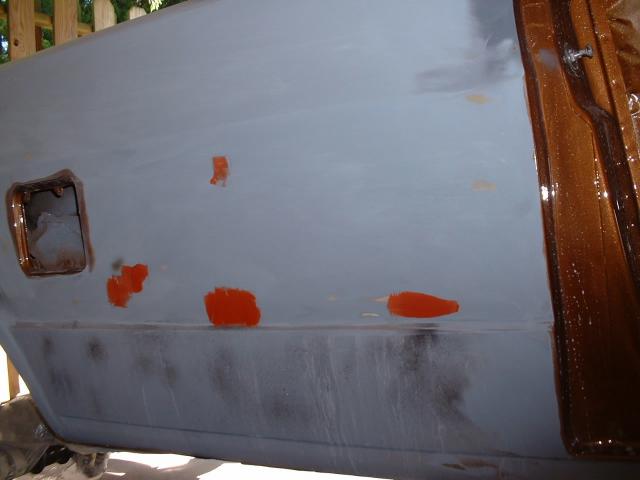
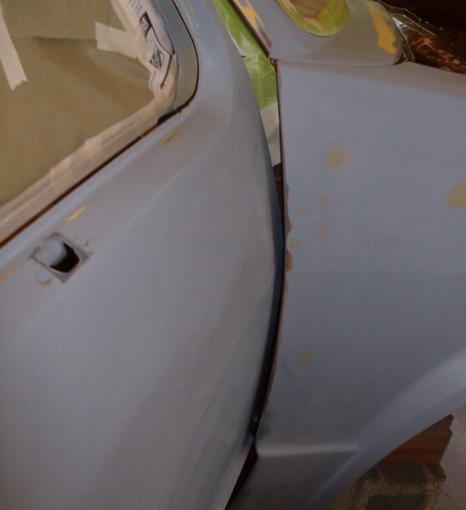
On the passenger side, the area from the door jamb back to the fuel filler had taken a hit sometime and had a botched repair. I had to remove all the old filler from that area, build part of the jam farward about 3/8" with fiberglass reinforced filler, and re-do the whole job. I worked the area 'till I couldn't stand to look at it any more and was sure it was flat, but it wasn't.
The guide coat and block revealed three low spots and a pin hole. By the way: When you spot a pin hole, drop everything right then and mark it with a pencil, they're just too easy of forget because they are so small. None of the low places were any larger than a quarter and all very shallow, so spot putty fixed them OK. They were about the thickness of a business card when I began hitting first on primer and metal around them. When you happen onto a flaw don't fret about it, just fix it. You know how now.
Spot putty takes a while to dry so skim it in and go on to something else for a while. You can see that I was working the side in sections. I skimmed in the putty, moved on to other things for a couple of hours, came back and finished this. Same deal with spot priming. If you wait on that one thing you'll try to work it too soon and screw it up big time, it never fails.
I'd forgotten to jamb that fuel filler access when I did the other stuff, but instead of mixing a batch of paint for the big gun I did it with my little air brush and a little over an ounce of materials. I used it, also, to repair the bug spots on the left door, all it took was a little clear coat.
Funny thing about bugs in paint: They usually die quick and when you sand them off there's not enough of them left to see. The worst remnants I've ever seen was a small line about the size of 1/16" of an eyelash. I did have one hardy little bastard I stood and cussed for 5 minutes while he bulldozed a gnarly one inch 'J' in my new white fender.
In these pictures you can see what I meant by 'getting a more uniform surface with a dry Scotchbrite pad'. The top photo is after wet sanding with 400-grit paper, and the bottom after Scotchbrite. This is nit-picky and not by any means prerequisite, but sometimes you'll find a tiny flaw that would otherwise be missed. While Scotchbriting a door, a curtain (run) in an underlying layer of primer jumped out at me like a starving dog after a blowing burger wrapper. It got by me twice, but the Scotchbrite sanding step caught it.
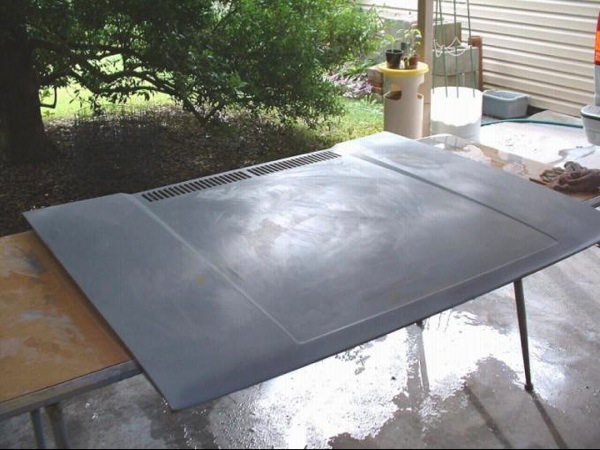
After wet sanding with 400-grit paper
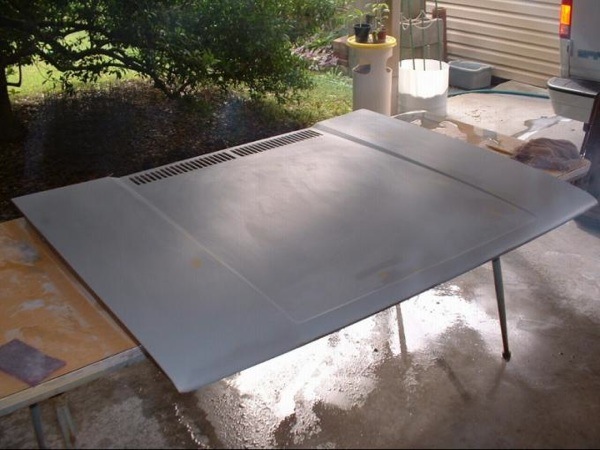
After wet sanding with Scotchbrite
You have entered a world of sight and sound, feel and smell, where even the unreasonable seems reasonable. Where all human cogitative thought is at risk, where finding nothing wrong makes you worry and wonder what you have missed.
You have entered....... The Compulsion Zone
The sandpaper is speaking to you in a barely audible yet husky voice that on a rough surface fades to a whisper as it polishes the surface smooth. You feel the resistance to movement fade as the surface "comes to you" before you wash & dry it for another inspection.
A tiny flaw gets a quick skim of spot putty or a shot of primer and you wait, but time drags on so you go onto something else. Time for a test and you push a fingernail into the edge of the putty. Not ready. You smell the primer and the heady fumes are still strong. Still not ready. You run your hand over the surface and feel the smooth perfection of it, bend down and spy across the finish moving this way and that to play the light over it from different directions. Soon the primer or putty is ready to work, but a little differently this time.
We're to the point that wet sanding with 400 paper seems heavy handed so we grab a worn out piece of dry 400 off the floor and fold it into thirds, worn side out. Then the stroking, petting, and hoping that this is the last time around for this last piece of a job that you have become part of, and that has absorbed every portion of your soul.
That's It! It's finished to the perfection you've worked and wished for over a period of weeks, and you stand back and gaze in awe as all the problems you had with this job seem to vaporize and rise into the air like a bad spirit returning to it's rightful abode.
(Tony's Note: Damn! JDW's waxing poetic. The fumes have finally gotten to him!)
At this stage you stand back, admire your work, and feel you're finished prepping; not quite.
You would do well at this point to take a damp cloth and wipe it over the entire surface. The water should spread over every square inch evenly with a damp sheen, and there should be no drag on the rag anywhere. Any drag means, "Stop right here and have a look". When you do, you'll see an area that looks almost dry. That's where solvents have risen to the top of a primered area that wasn't sanded properly or you missed altogether. That spells big trouble in the finish coat as "fish eye" or multiple blotches in the color coat that can't be painted out. The flaw will lessen only a little and become deeper with each successive coat and no amount of painting will eliminate it completely.
When you find one of these places, use a piece of dry, worn 400 paper and hand sand over it with an ever-so light touch. The paper will have a light drag to it's feel at the start and when you no longer feel that you run the damp cloth over it again. Repeat this, if necessary, until that surface matches the rest. Lightly stroke the area with the Scotchbrite, blow or wipe off the dust, and you are finished.
I realize that I'm taking you through steps that others will say are unnecessary. They may say they do it this way, or that; but, what I'm putting down in this article are methods I've gleaned from watching a half dozen different body men work and asking them questions about anything I haven't seen done before. Any step that can produce a better job is never wasted.
Oh, I advise not using Plasti-Kote #391 anti rust primer. It's good stuff, with a lot of solids, but dries rather slow and clogs sandpaper quickly. The Krylon Rust Tough works well, but is rather dark. Both companies market a variety of primers of different colors and compositions. Rustoleum makes excellent paints, but they are not compatible with a lot of other brands/types until they have dried and cured out completely which takes a couple of days. Primers and paints of all kinds retain some of their solvents for a very long time and we'll have more about this near the end of the article.
Masking Body for Painting
Masking is an art within itself and it begins with good automotive grade masking tape. My preferences are 3M and Clipper, in that order and when masking to a clean line I always use new tape. Get your tape from an automotive paint supplier and you can't go wrong on quality, they keep the right stuff. Clipper and 3M masking tapes have always been light tan in color, but 3Ms new green tape has become the one of choice and is slowly replacing their tan across the board.
Don't be tempted to use tape sold by building supply companies nor cheap tape to mask a line in automotive painting. The adhesives in those tapes may not hold an edge against the solvents in automotive paints and bleed by creating a gagged line. Or the adhesives could be converted into a slimy mess or hardened to the point the tape is difficult to remove. Cheap tape is OK for sticking down loose edges of masking paper and such as that, but not for working directly on the finish area.
The cheap stuff is used only to stick down loose edges of masking paper, the 3M tapes are used wherever you're making a line on the painted surface. It's OK to use cheap tape on a masking roll rig when covering outward from areas where you have already masked your line.
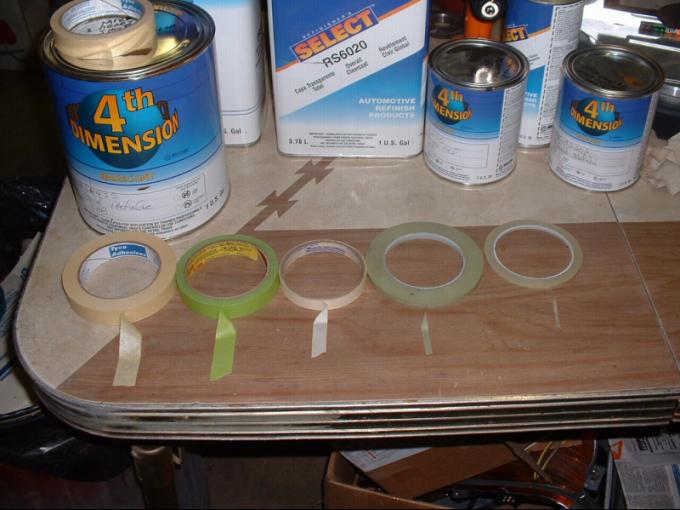
Masking tape comes in widths from 1/8" up to 2" with the most popular and universal being 3/4". In the picture you see a roll of 3/4" cheap Tyco brand, a roll of 3/4" green 3M, a roll of 1/2" cheap stuff, some 1/4" 3m Fine Line, and a roll of 1/8" 3M Fine Line tape.
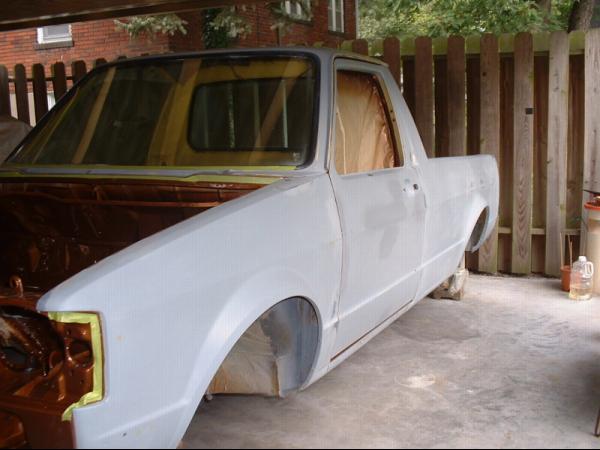
I masked the lines on the side of the truck with new 1/8" 3M Fine Line then used roll masking paper with cheap tape to mask out from that point. I used 1/8" Fine Line so I could mask that gold panel, which included some tight curves, with one piece of tape. Six curves on each side were too tight, the tape pulled to the insides of them and I had to re-do those areas. I re-masked with 3/4" tape, drew in the curves using a quarter, (an American coin with the value of 1/4 of a dollar), and cut them with a razor blade. Since this cutting was being done on the basecoat, cutting the paint wasn't a problem. The following clear coat filled and sealed the cuts and they are totally non detectable.
Masking a straight line should be pretty simple, but gets less simple when that line is 16' long. Stick the end of your tape down on the line you want, unroll a span of tape about 2' long, and move the span down near the surface. Do not pull the tape tight enough to stretch it, just enough to get it straight. Sighting squarely on top of the tape to the line you want lightly press the tape down with your finger in 3 or four places. Sight the line, lift and reposition the tape if it isn't right, but if you hit your line rub the tape down more firmly. Pull out a couple more feet of tape, hold a finger on the previous strip about 6" behind where you stopped, pull that area back up, re-sight, and stick it down as before. I don't know about you, but if I don't lift that last 6" of a run I'll get a little rise or swag right at that point. If you end up having to lift several feet of a line get some help. Have them hold the end of the tape near the surface and you concentrate on getting it on the line you want.
Masking Curves and Letters
When masking a sweeping curve, like the lower panel on the side of an Austin Healey 100, keep about a 1' span of tape between the point that is stuck down and the roll. Get the tape to the line by moving the roll and stroke it down as you go. It takes good eye/hand coordination, but if you've got that it keeps getting easier all the way.
Masking raised letters, such as those on the tailgate in one of the photos was done with 3/4" 3M green tape to make sure my cut edges didn't bleed under. At that point the tailgate was copper on it's perimeter and gold in the middle with the copper being masked. I began by masking completely across the tops and bottoms of the letters at the edges of their flat tops. That eliminated having to trim any letter on it's top or bottom edges. Next the rest of the letters were masked in a manner as to eliminate all the long line trimming possible and the tape was pushed down over the curves of the raised portions.
Then I sharpened a pencil, not so much to make it sharp, but to expose a lot of lead. Using the side of the lead, I stroked the edges of the letters to create a line to follow, and cut the letters out with a razor blade. The rest of the gold was then masked, the dark color shot, everything unmasked, and the results are in the photo. The top curves of the gold on the tailgate and the gold in those tight curves near the backs of the doors, on the cab, were done much like the letters were.
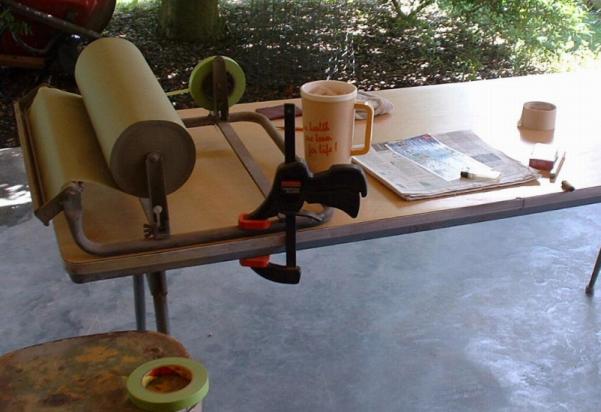
These are the essentials of masking. The paper roll rig isn't, I've never used one before, but I've got a lot of big time masking to do so I borrowed the rig and bought the materials. Newspaper does a good job if you double it and it works easier that way. Always start off by taping on the folded edge and you'll save yourself a lot of trouble.
Masking is an acquired skill and you will develop your own techniques as you go.
Masking Cracks and Tight Areas
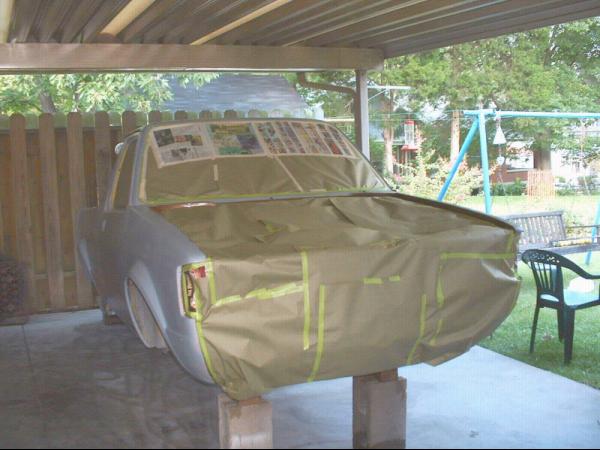
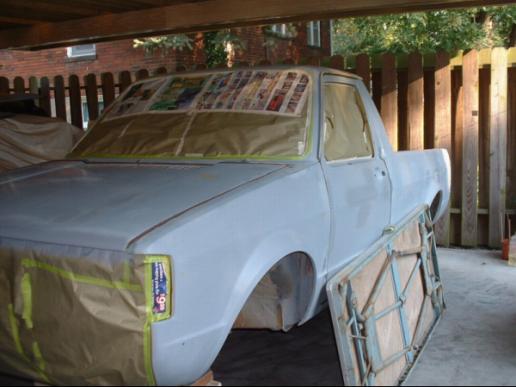
When painting a car some paint will always blow into the cracks around the doors, so we must get ready for it by masking anywhere we don't want paint to go to go. Most of what blows into the cracks will be rather thin, but that doesn't matter because the area already has a good coat of paint. What we want to avoid is a garish line anywhere in the door jams or edges and having overspray all over the inside of the door.
The ideal masking area on this vehicle was dead center of a 90° inside bend that goes nearly all the way around the jam. A line is less noticeable in a tight inside bend like that than any other visible area. Doors are usually pretty easy to find a good dividing line on. You can mask along the weather-strip area where it's close to the edge or up against the edge of the door skin where it folds against the door. I had to use a combination of the two on this door.
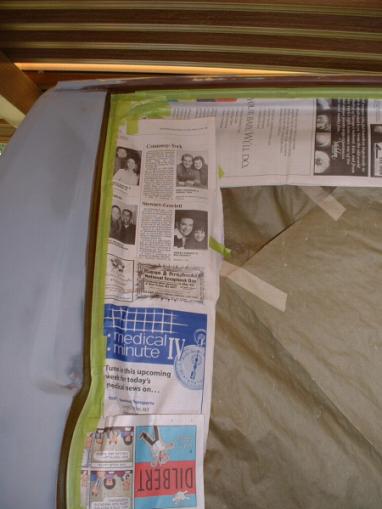
Tape your paper along the outermost point you are covering in the jam first, then press form it to the shape of the jam and tag the edges of the paper with a few pieces of tape. Forming the paper to the jam is important because if you tape it tight over the jam it will tear right in the jam area when you close the door. Keep it pulled in tight around the corners and edges of the door so it doesn't push into the unmasked areas when you close it.
When masking in tight areas, you just have to do the best you can. Stick one end of the paper down near the line you want, then stick the other end down, or you may have to work around a curve on the way. Working with a roll of tape in close areas is usually impractical so use as many short pieces as you have to in order to get the job done. You'll soon learn how to avoid making a crooked or jagged edge. It's not always possible to look straight down on the top of the tape while working a close line, but it's much easier to do when you can.
In this photo, we've worked into a tight cluttered corner with door hinges, a door stop fitting, and compound curves. There's just no room to work paper so we switch to 2" tape and keep sticking it on until everything is covered. Ahead of that tape is an even worse area that is covered in the next photo.
You can see that inside that crack (gap) is a painted void that is impossible to reach with the door on, in fact it's nearly impossible to see. Granted, nobody will ever see this area, but we're being picky here and we're going to keep most of the overspray from spreading in there. What I did was to take some half-sheets of newspaper, loosely wad them, and cram them into the void through the larger crack inside the door. This is something you may never have, or want for that matter, to do, but you know how to do it. Before I start painting I'll reach in the crack of the closed door with a hook wire and pull the paper up close to the edge.
I besieged a masking Guru and he sayeth unto me, "Anywhere you don't want overspray to go has to be masked up good and tight", so I doneth it from that day forward and life has been good.
The last steps in jamb masking it to skuff the exposed painted edges with Scothbrite. It doesn't need to be deeply sanded, only skuffed enough so the paint that blows into the cracks will stick to the surfaces we intend for it to get on.
Follow up each section you skuff with a clean rag and wipe away the dust.
The jamb masking of that door was holding it slightly open so I leaned that an old school cafeteria table propped against it caused the paper to 'take a set' with it closed.
At this point the sanding and masking is all done. The whole vehicle has been checked and rechecked and it's ready, just a couple more things and the paint goes on.
It's almost all over but the shouting, er, shooting...
Air and Solvent Cleaning
First blow compressed air into all the cracks and sweep the entire prepared area with it. I'll go over the whole thing with a rag dampened with water and look for fly specks or any other water soluble contamination.
Next comes the Prep-Sol, which is a preparatory solvent made by DuPont. There are several of these solvents under different names from different companies used to remove any oil based contaminates just before painting. The main culprits are: Skin oils from touching your skin or hair and then touching the primed surface, excess oil from aerosol primer from possibly forgetting to shake it up good before beginning to spray, and mysterious crap that just got there somehow.
You soak a clean rag with the solvent, and wipe an area with a good wet; not quite a running coat. Let it set a few seconds and wipe it dry, or nearly so, with another clean dry rag. The Prep-Sol will bring any excess oils to the surface and the dry wipe removes them. The solvent should lie in a uniform flat wet coat and if you see any unusual separating or "funny" pattern you have found a heavily contaminated area. Keep wetting and drying that spot until the solvent lies as it should. Give the solvent a few minutes to dry out completely before spraying any paint.
A word about rags while prepping for paint. They must be absolutely free of any, even very slight undetectable, traces of oil, wax, silicone, Armor All, or anything like these. Even rags that have been washed in the same batch with a contaminated rag are taboo, they have to be cleaner than a cloth table napkin. Most body shops don't even use cloth rags at this stage and have opted for paper "wipes", usually lint free ones which are pretty expensive as paper towels go.
The final step before you start shooting paint and done immediately before, is to wipe the entire vehicle down with a tack cloth for automotive painting. A tack cloth is just a small cloth impregnated with a special tacky substance that makes it a super efficient dust cloth. None of the "tacky stuff" will stick to the surface but the rag will pick up all dust, cloth lint, or whatever is there.
Important note: Be sure you have read and understand every detail in the instructions of the paint you are using. The containers have instructions on them, but ask your supplier for a detailed instruction sheet or sheets.











talking with a mechanic about this today...
need ideas
regular practice to make it perfect biro
jodoh
Want to leave a comment or ask the owner a question?
Sign in or register a new account — it's free