Click here to see all articles in this series: DIY Wood Steering Wheel
Attaching to the Steel Frame
One last dry fit and some preliminary sanding, and I decided it was time to fasten the wood to the steel. The fastening would be done in two stages. First, the steel wheel would be epoxied to the front wood half. Second, the back wood half would be glued to the front subassembly.
For the first glue-up, I chose an epoxy system that I've used before: West System 105/205 which is a two part resin and hardener (see Figure 36). This epoxy system is very strong and is often used in marine applications – I had purchased the materials a few years ago when making some front doors for my house. I knew that the front glue-up would need to be strong, but it also needed to have some gap filling capability since the groove in the wood blank was wider than the steel rim. I did some research and determined that I should use a filler material with the epoxy – specifically West Systems filler 406 Colloidal Silica. This particular filler would add significant structural integrity to the bond.
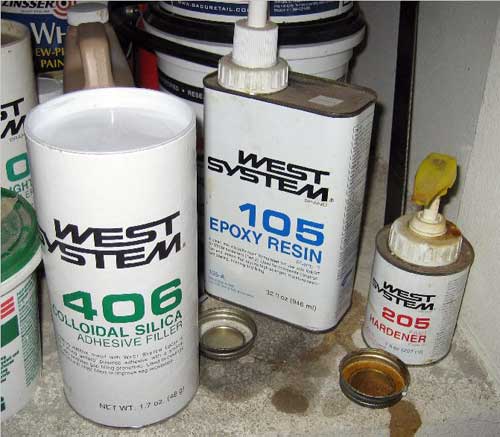
Figure 36: West System epoxy system
I mixed the resin and hardener and then added filler until I had a consistency about equal to mayonnaise. The epoxy was too stiff to pour and I didn't want to make a mess on my parts so I used a baking trick and made a piping bag out of a plastic sandwich bag. I used Ziploc brand but you can use any other, fill the bag with the epoxy mixture then make a small cut to remove a tiny corner of the bag. Squeeze the bag gently from the back and you can neatly pipe the epoxy into the groove of the wheel.
Figure 37 shows the epoxy after being piped into the groove. After filling the groove with the epoxy I gently pressed the steel rim into the epoxy. I was careful not to smear any epoxy outside of the groove because the remaining wood surface would be part of the next phase of glue up. I put the subassembly on a flat surface and then used some clamps to gently hold the steel rim in place; see Figure 38. As discussed earlier, the steel rim was not a perfect circle, but of course the groove routed in the wood was a perfect circle, so the epoxy had to fill that gap. You can see this in Figure 39.
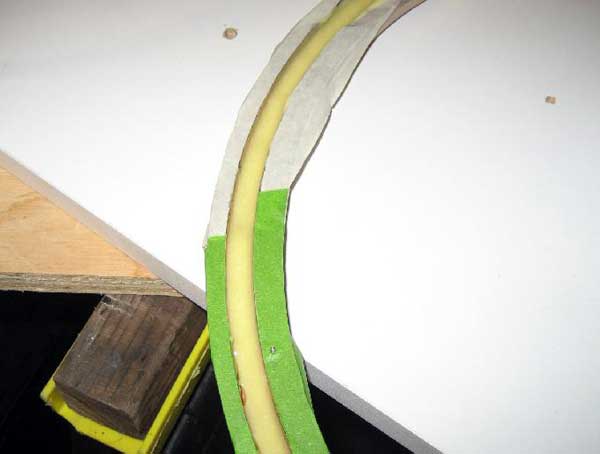
Figure 37: Groove filled with epoxy (tape on either side of groove to prevent contamination of surface to be glued later)
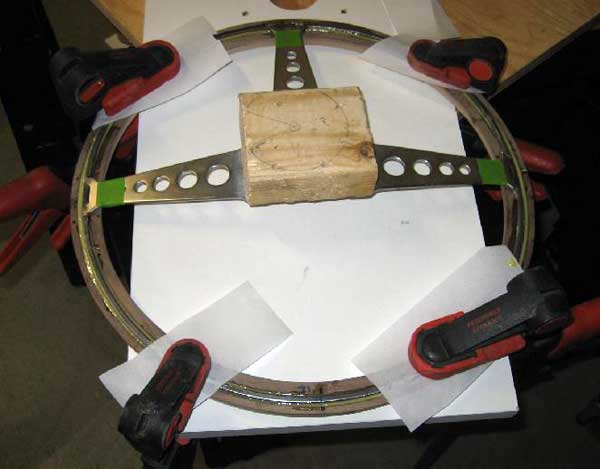
Figure 38: Steel rim clamped into epoxy filled groove
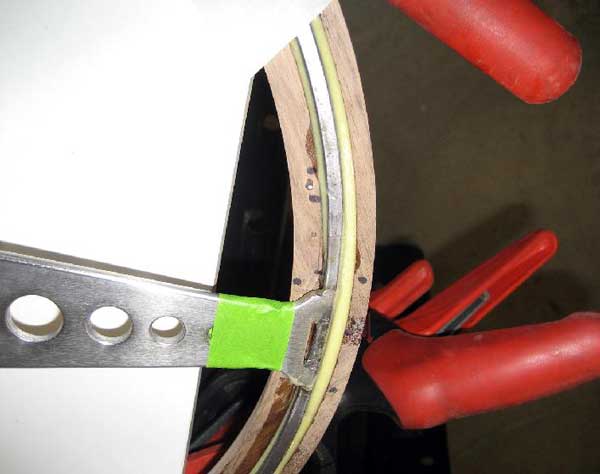
Figure 39: Detail showing how steel rim is not concentric with circular groove but epoxy filled the gap
The West Systems epoxy was left to cure overnight. The next phase of glue up was a little different than the first phase. Gluing the back wood half to the front subassembly was mostly a wood-to-wood joint. This was the case since most of the steel rim rests in the groove of the front wood half. So, I needed glue that would work for wood-to-wood but also some wood-to-steel. Gap filling was a secondary consideration since I wanted to fill the gap between the steel rim and the groove in the back wood half. I could have used the same epoxy system for this second phase of glue up, but I would have had to use un-filled epoxy for the wood-to-wood joint and filled-epoxy for the groove to allow for the gap filling. I decided against this strategy, probably out of sheer laziness more than anything, and I simply used Gorilla Glue as I did during the original wood blank glue up. As already discussed, Gorilla Glue
is urethane glue that cures in the presence of moisture. It fills gaps nicely and it bonds almost any material to almost any other material so it was a perfect and simple solution for this glue up. I applied the glue to the groove and the wood-to-wood surface on the back half, then used a spray bottle to apply a thin film of water to the front subassembly. I used a good number of clamps to hold the halves together – just enough clamp pressure to avoid squeezing out the glue; see Figure 40.
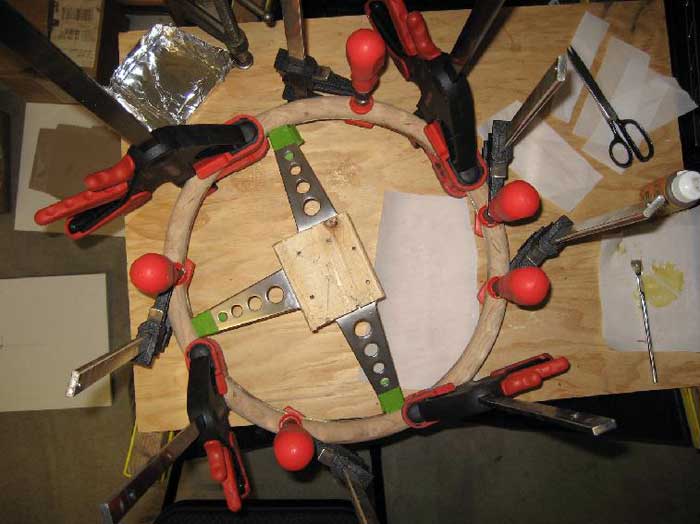
Figure 40: Back wood half glued and clamped to front subassembly
Finishing
Finally, I can see the light at the end of the tunnel. After allowing the glue to cure I was left holding a complete steering wheel assembly. Only the finishing remained! Most of the cutting was done with machine tools (router) so not a lot of hand sanding was required. I sanded entirely by hand using 150, 220, 320, 400, and finally 600 grit sandpaper. It was simple and not unpleasant work that I did outside on a nice day thus avoiding a lot of cleanup in the garage.
After no more than a couple hours total sanding time, I was satisfied with the finish but I wanted to add one last flourish to my design. I notice some wood wheels have rivets which are used to hold the wood to the steel or aluminum rim as appropriate. Modern glues are quite outstanding, and I don't particularly care for the appearance of the rivets so they weren't needed for any structural reason, so I didn't want to replicate that particular look. However, I wanted some extra element of style purely for aesthetics if nothing else. One afternoon I was staring at a guitar and noticed the dots of inlay on the fret board. Bingo! I had figured out what I needed. I went to a local guitar store and found mother-of- pearl dots precut in various shapes. At less than $1 each, it was just what I wanted. I bought six dots of 5/16 inch diameter thinking I would place them equilaterally along the perimeter of the wheel, but in the end I decided that was too busy so I put just a single dot at 12 o'clock. It serves as a quick visual reference that the wheel is pointing straight ahead and it's just enough of an accent to appeal to the eye. The dots are .050 thick so I used a forstner bit to drill a very shallow hole into the wood rim, and I used a tiny dab of Gorilla Glue to hold the dot in place. When it was dry, I used fine sandpaper to shape the dot to the profile of the wheel; see Figure 41. I really like the mother-of-pearl since it's a natural material and to my sensibility it's a nice organic accent with the wood. Simple, elegant, and cheap!
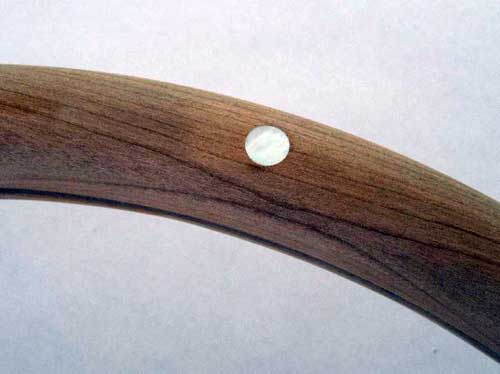
Figure 41: Detail showing completed mother-of-pearl inlay
I now had to decide on the finish. I didn't want too dark a steering wheel as the cherry and walnut would darken a bit own over time with UV exposure. However, I didn't want to simply apply a clear finish so I mixed up a small batch of water based stain just to even out the wood tone. I used what I had on hand and came up with a red/orange/brown/amber mixture that I named "MG Terra Cotta." Since it's a water based stain, I used a wood conditioner prior to the application of the stain. The conditioner causes some very slight raising of the wood grain so I did a quick touch up with sandpaper before applying the stain. I left the stain on the wood for only a few minutes before wiping off any excess. I was satisfied with the result as it really seemed to even out the tone of the wood; see Figure 42. My plan was to let the wheel sit like this for a couple weeks of UV exposure (sunny windowsill) just to get the cherry started on its own suntan.
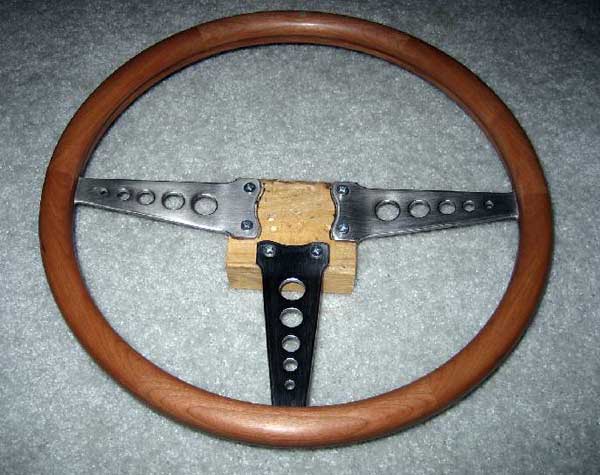
Figure 42: Wheel after application of stain (before finishing top coats)
While the wheel was getting a suntan for a week or two, I had to decide on the final top coats. I didn't want to use some run of the mill polyurethane, they do not offer enough protection against UV, temperature fluctuation, or other issues. I went back to the local marine hardware store and looked into various marine varnishes. I finally selected a material called Interlux Schooner Varnish. This particular varnish offered everything I was seeking in a finish: dries hard and durable, smooth glossy finish, UV resistant, water proof, etc. As a marine finish, it should last for many years in this application. Initially I had wanted a semi-gloss finish but I couldn't find a satisfactory brand. If I end up not liking the gloss finish, I can always scuff the final coat to knock off the shine.
I applied five coats allowing each to cure overnight. Between coats, I used bronze wool to smooth things instead of sandpaper. Be sure you do not use steel wool as any tiny bits left behind will oxidize and show up as black and rusted bits of metal in your topcoats! I used a foam brush to apply the varnish instead of a natural bristle brush; I found the foam brush to offer excellent control with no brush strokes.


your help, perhaps one day will come and be ready for Spring! Thanks for your detailed and
documented explanation of hoe to get 'er done!
you.
Now to find a steering wheel on Ebay for the progect.
Any project need a plan and a starting point. Reading this article is a great start.
Can you tell me what you did to the metal? It looks so shiny and pretty.. I am trying to restore mine (I have that same one with the foam) I just removed the surface rust, but the metal looks like stained. Any help is appreciated!
morris minor wheel....
morris minor wheel....
project instructions but with a different steering is it possible to
cut and weld peices so that it becomes a quick release because the
steering i have has round edges and the midle (center part)is for stock
cars... need your help thanks
similar, but based on the original sprung/dished profile Minor steering
with a thinner rim. Though this would entail some unique difficulties of
its'own I think. One day. Great article.
me money!
Thank you!
process, use of a prototype, making the few tools you had work, and
general description of how and why you did what you did. Finished
product looks outstanding.
Want to leave a comment or ask the owner a question?
Sign in or register a new account — it's free